Sunday, August 28, 2011

Understanding Exposure Part 1: Moving your camera into Manual mode


 Modern cameras with their built-in modes for every anticipated photo situation from macro to landscapes have actually made it more difficult to learn camera basics by separating the photographer from the essential elements that make up a correct exposure.  The purpose of this lesson is to break down camera exposure into three basic elements -- what I will be calling "speeds" -- and show how each of these elements relates to the others.  From there you will find that it is easy to determine the correct exposure in any situation and that mastering control over exposure is what will provide you with creative control over your photograph.
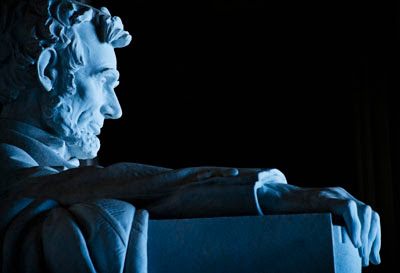
Most cameras meters will read a scene and try to average it out to a neutral exposure.  In situations like this the photographer must determine in advance what is important and adjust the exposure to obtain the proper results.  Here, setting the exposure for the face of the statue rendered the deep background shadows a dramatic black in contrast.

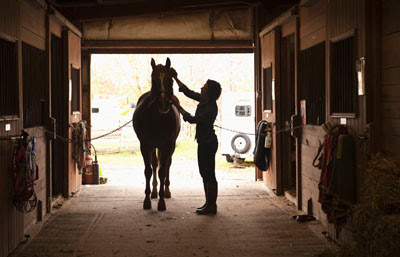
Only a knowledge of camera exposure will allow a photographer to capture a scene such as this.  The interior of the barn shows detail while the exterior if over-exposed.  Knowing where to place the exposure made all the difference in this image.
 
The Three Speeds:

There are three elements that affect the amount of light hitting the camera sensor.  We will refer to each of these elements as a "speed" in the sense that each controls in its own way how fast light is deposited on the sensor.  The three speeds are:  shutter speed, lens speed, and sensor sensitivity speed.  the three need to be in harmony to produce a correct exposure.  Sounds simple so far but gains in complexity as you realize that you can in fact make changes to any of these speeds (usually for aesthetic reasons) so long as you make an equal and opposite change in any of the other two speeds.  Let's look at each speed separately and then see how they are related.

Shutter Speed:

Shutter speed is usually the easiest to understand.  It simply refers to how long the camera shutter is open to allow light to pass on to the sensor.  This is measured in seconds and fractions of seconds.  The typical increments of shutter speeds starting from one second are:

1 second, 1/2 second, 1/4 second, 1/8 second, 1/15 second, 1/30 second, 1/60 second, 1/125 second, 1/250 second, 1/500 second, 1/1000 second, 1/2000 second.  

Shutter speeds exist above and below these increments, but you will notice a trend in this list.  Each shutter speed halves or doubles the speed of the shutter speed immediately before or after it.  For instance, 1/125 second is twice as fast as 1/60 second and twice as slow as 1/250 second.  Looked at another way, 1/125 second allows half the amount of light to pass as 1/60 second and twice the light as 1/250 second.
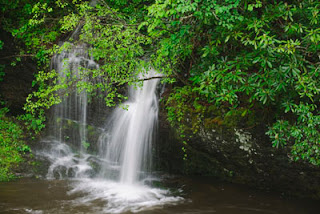
A very slow shutter speed of 1/4 second was necessary to allow the running water to blur.  To keep the rest of the scene in sharp focus it was necessary to have the camera on a tripod.
 
In the past, full increments were the only shutter speeds cameras had.  The advent of electronic shutters  has allowed manufactures to create fractional shutter speeds.   Adding to the confusing, the user can actually set the fractional increment in a menu option on most DSLR cameras.  For now, it is important to grasp the basic shutter speed units listed above.  The fact that they can be further divided into 1/3rd or 1/2 units won't  alter the principle of inter-related speeds.
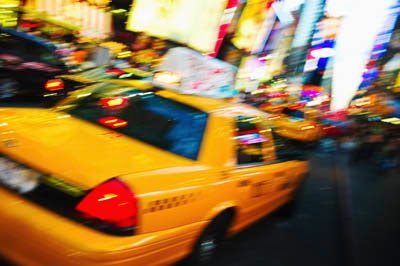
With a hand-held camera the photograph panned the camera from left to right as the taxi went by.  This created some blur in the scene of New York's Times Square that accentuates the excitement of night time in the city.
 
There are, of course, reasons why you would want to select one shutter speed over another.  Typically these reasons have to do with selecting a fast shutter speed that will freeze a particular action, or selecting a slow shutter speed because it will allow you to close the lens aperture further to increase the area of focus, called "depth of field".  We will cover these creative reasons in more detail individually in a future lesson.  For now, let us stick to how the three speeds are related on one another.

Lens Speed:

The speed of a lens is controlled by its aperture, and reflected in a number called the "f/stop".  The aperture is a moving diaphragm inside the lens that changes in size.  As it opens, it allows more light to pass through the lens to the sensor.  As it closes, it cuts the amount of light passing on to the sensor.   Here is a list of the common f/stop apertures found on camera lenses:

f/1.4, f/2, f/2.8, f/4, f/5.6, f/8, f/11, f/16, f/22, f/32
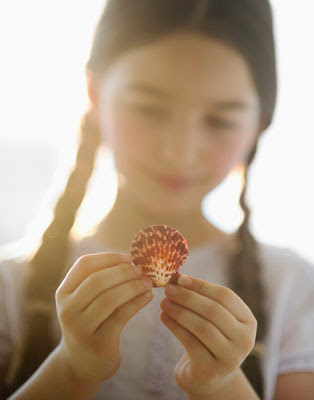
In situations where you want a very shallow depth of focus, the lens aperture needs to be very fast (i.e. open). For this photo an aperture of f/2 was used on a 135mm telephoto lens to pinpoint the focus on the shell while the little girl's face was completely out of focus.
 
As with shutter speeds, there are further aperture openings beyond this list, but this is the practical limit.   Like shutter speeds, these apertures also half and double each other so that an aperture of f/4 allows half as much light to pass as f/2.8, and twice as much light at f/5.6.  Also like shutter speeds, apertures can be further broken down into thirds or half units by setting the camera menu.  For now we will stick to the full one-stop increments as an easier way of understanding exposure relationships.
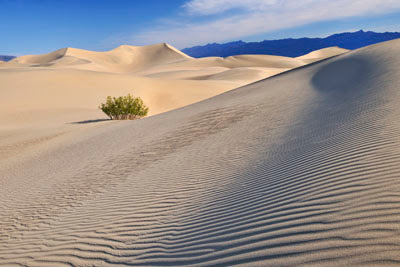
Selecting a very slow lens aperture of f/16 and maintaining the native 100 ISO of the camera contributed to the overall sharpness and depth of focus in this image of dunes at Death Valley.  Knowing this going in the photographer realized that  the camera needed to be on a tripod to compensate for the very slow shutter speed of 1/15 second.
 
Sensor Speed:

Sensor speed is the speed at which the sensor captures light.  It is measured in ISO.  Most modern sensors have a base ISO of 100 or 200.  From there sensors increase in speed in increments similar to the other two speeds, namely by doubling the light sensitivity of the prior speed as follows:

ISO 100, 200, 400, 800, 1600, 3200, 6400, 12800.

Each unit doubles or halves the nearest unit.  For instance, ISO 400 has the sensor capturing light twice as fast as ISO 200 and half as fast as ISO 800.  You might ask why not go for the highest available ISO?  The answer is that any increase or decrease in ISO speed from the camera base unit (referred to as the "native ISO") degrades image quality by introducing noise (similar to "grain" in film) , and loses detail.  So increasing (or decreasing) ISO speed from the norm is a trade off.
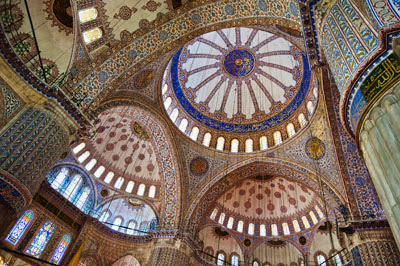
Many locations to not allow a tripod.  This photograph of the interior of a mosque in Istanbul was achieved by increasing the ISO of the camera sensor to 1600 and selecting a fast, open aperture on the lens that allowed the camera shutter speed to be set high enough for it to be hand held.
 
As with the other speeds, ISO can be further broken down in 1/3rd increments.  (e.g. 200, 250, 320, 400, etc.)  For the purposes of our discussion, let's not confuse the issue and stick to the full units in all speeds.

Putting it all together:

A light meter is used to measure the amount of light falling on a scene.  Modern DSLR cameras have a light meter built into them.   Professional photographers will usually also have a hand held separate light meter to determine accurate readings of a scene and to record the differences between the shadows and highlights.  For now, let's just work with the built-in camera meter.

When you look through the viewfinder of your DSLR you should be able to see the light meter scale.  If you don't know where it is, consult your camera manual.  Most scales have a center mark, usually a line, that marks when the exposure is correct.  There should also be a plus (+) and minus (-) indicator on either side of  the center line.  In between there are usually marked scale increments.  These may be given in thirds, halves, of full speed increments.  

The correct exposure for any scene is measured by the central indicator of the exposure scale.  There should also be a second moving element -- a line, dot,  or light -- that indicates the manual setting of the camera as it relates to the correct exposure.  Simply put, when your camera is in manual (M) mode and the center of the exposure scale is lined up with the moving element of the scale the camera is set for a correct exposure.  If the moving part of the scale is on the minus (-) side of the scale, your camera setting is under-exposed and the picture will be too dark.  If the moving part of the scale is on the plus (+) side of the scale, your picture is over-exposed and will come out too bright.
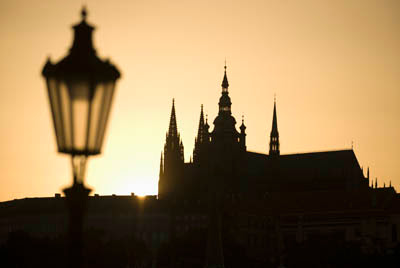
Deciding to have the cathedral in silhouette and the foreground lamp out of focus were creative decisions the photographer used in determining the exposure for this scene.
 
How to achieve a correct exposure in manual mode:

With your camera in manual (M) mode, you first need to select an ISO setting.  This is usually done from either a menu option of a button or dial marked "ISO" on the camera body.   Sensor speed (ISO) degrades image quality as it increases so you want to keep it set as close to the native ISO of the camera as you can.  Circumstances will dictate what you can do.  On a normal, sunny, or lightly overcast day, it is usually best to leave it at the native ISO setting of 100 or 200.  Indoors or on an overcast day or deep shadow area, you will want to increase ISO.  For this a range of ISO 400-800 will do the trick -- keeping in mind that lower is better.  In very dimly lit situations, such as at night, in a darkened room or club, you will need to boost the ISO towards its maximum level - a range between 800-6400.  As a rule of thumb, try not to boost the ISO beyond 1600.  On most cameras image quality deteriorates dramatically above that.

Once you have set your ISO, open your lens aperture (f/stop speed) to its maximum opening.  Next change the shutter speed until you zero out the exposure scale that is in your camera on the camera display.  By "zero out", I mean move the needle, or whatever mark your camera has, until it coincides with the middle setting of the exposure scale.  At this point, you have achieved a correct exposure setting .  The next thing to understand is that there can be more than one correct exposure.  Understanding this and how to make exposure changes is at the heart of why you would want to use the manual setting  at all.

Relationship of the three speeds:

We have already seen that each of the three speeds -- shutter speed, lens speed (f/stop), and sensor speed (ISO) -- half and double the increment above and below it.  That means that all three speeds are related in the same way.  If you make a change in any one of them, you can equalize that change with a move in the opposite direction of one of the other speeds.  Let's look at an example.  

Suppose you have a correct exposure of ISO 200, f/2.8, and 1/500 second, but instead of f/2.8, you want to have an aperture of f/5.6.  f/5.6 is two steps away from f/2.8 (f/2.8 to f/4 to f/5.6).  To compensate for that move you have to make an opposite move with one of the other speeds.  For instance, you could decrease the shutter speed to 1/125 second (1/500 to 1/250 to 1/125 equals a move of two increments). Alternatively,  you could increase the sensor speed from ISO 200 to ISO 800 (ISO 200 to ISO 400 to ISO 800 is two speed increments).  Instead of either of these moves you could have decided to make one incremental change in the ISO from ISO 200 to  ISO 400, and one shutter speed change from 1/500 second to 1/250 second.  That also would have equaled a two stop speed change to equalize the 2-stop change you made to the aperture.
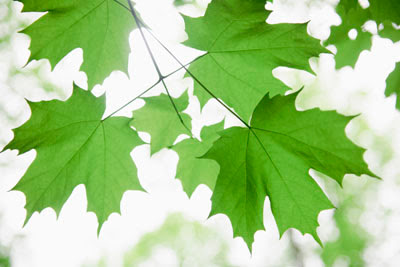
Most cameras set to automatic would darken this image and yield the background more in focus.  Creative control over the aperture and knowledge of exposure was necessary to arrive at a light and airy image with a soft, out-of-focus background.
 
Conclusion:

The question all this raises is "why" you would want to have control over your exposure speed settings.  The answer to this is that selection of aperture, shutter speed, and to some extent ISO is a creative decision.  There are specific reasons why you would want a slow or fast shutter speed or why you would want to select an open or closed aperture. There are practical reasons also.
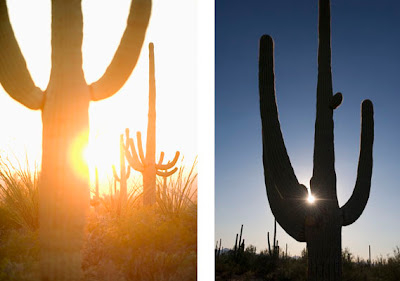
Sometimes exposure alone can completely alter the outcome and interpretation of the image.  These two photos were taken within minutes of each other.  Creative choices of exposure and lens choice made the difference.  Each is a different way of seeing the same scene.  Knowledge of exposure and the ability to change it resulted in varying interpretations.
 
Knowing when and why to veer off of the "correct" exposure is what creative photography is all about.  The next three lessons will cover each of the three speeds in depth and explain the practical and creative potential of each.

Saturday, August 6, 2011

Lighting: Using a pop-up flash

Recently, someone asked me to write an article for this blog on how to use pop-up flash to obtain natural looking photos.  I have to admit that I do not use a pop-up flash very often due to its limitations.  For one thing, it has a short range, usually around 12'.  But worse than that, it is positioned on the camera so the light it throws is very harsh and directional, and casts hard shadows.  This last feature is worsened when the camera is turned vertical so the shadow falls off to one side of the subject instead of down and behind where can be hidden.  Nonetheless, I thought the project would be interesting to explore so here it is.

The real trick to using on-camera, pop-up flash correctly is in not allowing it to dominate the scene.  When used as the major light source, the flash creates an artificial, flat, and overly bright light that destroys the natural ambiance of the scene.  What we are going to try to do here is look at methods of applying the flash to enhance the naturally lit scene rather than dominate it.

Let's examine some of the uses for on-camera flash as an auxiliary light source.

Outdoor fill flash:

It might seem counter intuitive to use a flash outdoors on a sunny day, but this is a situation that can benefit the most.  Harsh shadows on the face from a strong overhead sun can ruin an outdoor portrait.  The difference in exposure between the bright highlights and deep shadows is so great that important detail may be lost in one or both areas.  There are two ways of dealing with this, both involve what is known as "fill flash".  When the subject is facing into the sun, flash fill can be used to brighten the shadows and equalize the exposure between them and the highlights.
Harsh shadows on a sunny day can ruin an outdoor portrait.  Popping up the on-camera flash to fill in the shadows with extra light results in a much more flattering look.  Most cameras can handle this by placing them in TTL flash mode.
 Light from most built-in flash units are of very low power so you may need to use them in close to achieve full benefit.  Over powering the sun is no small task.

A better solution for an outdoor portrait might be to turn the person to face away from the sun.  This puts them in a back lit situation, which is much easier to fill, and often more flattering.
Positioning the subject with the sun behind them results in a very flattering back lit scene.  Using the on-camera flash here adds more detail to the face and a catch light to sparkle the eyes.
Outdoor flash fill situations are usually very bright so determining proper exposure is primarily a matter of using your normal camera exposure, setting the flash on TTL, and allowing the camera/flash derive its own output.  Working in the manual setting you can select the correct exposure reading for the overall scene.  You don't have to worry about the shadows because this is the area that the flash is filling to bring its exposure up to the level of the overall scene.

You will need to check to see that you are not inadvertently overexposing the scene.  Most cameras have an upper shutter speed limit at which a flash can be used.  This may not be high enough to properly expose the scene.  Often this is a result of the ISO being set to high, or may be a result of trying to use a lens aperture setting that is too open.  

Indoor flash fill: 

Indoor flash fill is usually not as necessary as outdoor fill, but it may add clarity and detail to the subject.  In addition, it will add a flattering "catch light" in the subjects eyes.  Catch light is the bright dot of light that is reflected in the subjects eyes making them sparkle.

An indoor situation that might require flash fill would be one where the available light is sufficient to take the picture, but the shadow exposure is beyond the range of an overall even exposure.  Filling the shadows with light is similar to outdoor flash fill, although a major difference, light intensity, will likely be much less and may lead to overexposing the subject.  Care must be taken to achieve an overall even exposure that does not washout the background.
Even though you can take a photo indoors without a flash, you may want to add it to create a more even, flattering light.

Slow synch flash:
This technique is used when the background scene is very dark relative to the foreground subject, as with a person photographed against a night city scene, or a person photographed indoors where the scene is quite dark.  Slow synch derives its name from the slow shutter speed necessary to allow the background to record more naturally in the photograph.  Typically, on most cameras, particularly when using them in auto setting, the flash is synchronized to a shutter speed between 1/60 - 1/250 second.  The flash will only function at a speed slower that this synch speed, and the camera tries to use the highest synch speed available.  This is much too fast to record any detail in a dark scene.
A scene like this is very difficult to light and achieve a natural look. Typically, the scene would be dark and the warm glow from the candles would be lighting the subjects face.  Pop-up flash distorts the natural feel of the scene and produces an false interpretation of the scene.  Direct, on-camera flash gives off a harsh, directional light that produces distinct shadows, particularly when the camera is in a vertical position as it is here.  Furthermore, the color of the flash light seems false because it is balanced for daylight, while the scene itself usually has a warm, yellow glow associated with indoor lighting.  Finally, the flash completely overpowers the light from the candles falling on the subjects face.
In order to achieve a more natural look that harmonizes the background exposure with the foreground subject receiving light from the flash, it is necessary to decrease the shutter speed to a point where the background brightens up to normal exposure.  This may result in a very slow shutter speed, one that will normally blur a photo.  Since the flash is lighting the primary subject, it is not contributing any blur from the slow shutter.  Only those areas receiving no light from the flash are subject to blurring.  So slow synch flash is a technique where a shutter speed slow enough to record the background properly is combined with the on-camera flash lighting the main subject.  You want to try to harmonize the two lights.

Many modern cameras have a mode setting for accomplishing slow-synch flash automatically, but they do not always work properly because they are not tied into the nuances of the variety of scenes you may come across.   Furthermore, in these auto modes the camera selects both shutter speed and aperture.  You might want to use a different aperture for creative reasons,as we did in the sample below. 

To accomplish slow synch flash yourself, set the camera to "M" for manual mode.  Select an aperture setting that you find works best -- wide open to blur the background, or stopped down to bring the background more into focus. Take a light reading of the background scene, but select a shutter speed that will under-expose it approximately 1 1/2 stops.  Keep your flash in TTL mode so the camera will determine the correct amount of flash to deliver onto the foreground subject.  Take a test photo and examine it.  If you would like to have the background brighter, slow the shutter speed a bit more.  If you want it to be darker, increase the shutter speed.
Here is the same scene as above shown in slow synch.  The background is brightened considerably, plus it is softly out of focus because the slow synch lighting method allowed the use of a wide open lens aperture.  A natural, overall warm yellow glow permeates the scene and some light from the candles still falls on the subjects face.
 
Flash softening aides:

Direct light from the on-camera flash is very harsh and directional.  It produces a false impression of the actual scene with a hard edged shadow, normal color balance, and unflattering detail.  Slow synch already helps this, but using a diffusing element in front of the flash can help soften it more.  I researched several inexpensive, commercially available devices to discover which would work best at producing the most natural light.
Number 1 is the Gary Fong Puffer.  Number 2 is the Interfit small camera diffuser.  Number 3 is the LumiQuest Soft Screen.
No diffuser was used in the photo on the left.  The shadow is hard, and there is a distinct hot spot on the models forehead reflecting the light of the flash.  Number 1 shows the results of the Gary Fong Puffer.  Light on the models face is softened.  The glare on the forehead is diminished, and the shadow on the wall is softer and less pronounced.
Number 2 shows results from using the Interfit diffuser, and is the best of the three devices.  The models shadow has completely disappeared and the light on her face is soft and even with no hot spots.  Number 3, the LumiQuest is little better than using no diffuser at all.
Flash diffusion works best when the diffusing surface is large and placed far enough away from the flash to spread out the light.  When it is too close, it might be diffused but it is still directional and will cast a distinct shadow.  As distance and diffusion surface increase the light is more evenly distributed and falls on the subject softly and naturally.  In the samples above, one reflector, the Interfit small camera difuser, accomplishes this softening effect better than the others.

Conclusion:

In many situations an on-camera flash can supply the extra light needed to add detail to a dark scene or fill a harshly lit situation.  Using the light properly is the key to success on whether the resulting photos have a false  or natural look to them.   
Camera pop-up flash is not necessarily the best choice for lighting, but it certainly is the handiest and often the only choice available.  Learning to use it properly can greatly enhance capturing your candid moments.
In a future article I will expand the use of camera flash by showing the use of more powerful, auxiliary flash units that can be used either on or off the camera, and can be used in tandem with other flash units.

Wednesday, July 20, 2011

Technique: Capturing a Splash

The photo technique for capturing a high speed splash is not difficult once you understand the basic setup.  When taking pictures of water, or glass for that matter, you need to begin by lighting the subject from behind.  Since transparent liquids and glass allow you to see the background, this is the surface you need to light first.  If your subject is highly transparent, like water, the background may be all you need to light.  Otherwise you can add two more lights, one pointing directly at the subject from behind, and the other aimed at the subject from the front.
Blue gels were put over the lights to add some color to this scene.  The background lights were aimed low so there would be a fall off of light causing a gradual shadow towards the top.  Note the black lines in the water.  These are caused by reflections from the black tub placed beneath the water to catch it.  The lines help sharply outline the water shape against the light background
Equipment:

The key to freezing high speed action is having a light that gives off a very short duration of flash.  Most flash units made for SLR cameras fall into this category.  The flash duration is even shorter when the flash unit is used at a lower power rating, such as 1/16th or 1/8th power.  The trade off here is in depth of field.  In order to keep the splash in full focus you will need to stop the lens down to a low aperture, such as f/11 or f/16.  

A light meter that can measure light from a flash is helpful, but not absolutely necessary.  You can probably come close enough to the correct exposure with some trial and error tests.

This setup uses four Nikon SB-900 flash units.  Two are aimed at the background.  The other two are aimed at the subject, one from behind right, the other from the front left.  Two units are used on the background to keep the flash power on a low setting that will allow for even shorter duration of flash.  The black tub does double duty.  It catches the water from the splash, but also caused black reflections in the liquid and glass to help define its outline. 
 
Setting up the camera:

Your camera may have trouble focusing on the splash so set it to manual focus and, with the camera on a tripod, take a manual focus reading of an object placed in the spot where the splash will occur.  Put the camera in its manual exposure setting and choose the highest shutter speed you can for your camera/flash combination.  This is usually in the range of 1/250th of a second.  A lens of medium focal length is a good choice.  The ISO setting should be set low to maximize quality. 

An assistant dropped one ice cube into the soda from about a foot above the glass.  Timing has to be perfect to capture the splash at the right moment.  Try keeping both eyes open so you have a peripheral view of the hand dropping the ice cube and can be prepared to snap the shutter at the right moment.
 
The exposure on the background should be approximately 1-2 stops brighter than the light falling on the subject from the front.  With the camera set to the correct exposure for the subject, the background will now be pure white.

A shot like this requires pinpoint timing and very good hand-eye coordination.  An assistant threw a dart at the water balloon, and the shutter had to be pressed just as the dart entered the frame.  Keeping the shutter button half-pressed will shorten the length the finger has to travel to complete the exposure.
This is a combination of two water splashes similar to the one that began this article.  They were put together and twisted with post-processing software.  The exposure setting for all the images in this article were done at 1/250th second, ISO 200, and f/14.

Thursday, July 14, 2011

How to Photograph Manhattanhenge


Twice a year, approximately  three weeks both before and after the summer solstice, the sunset lines up with the street grid of Manhattan.  The term for this, Manhattanhenge, was coined in 2002 by astrophysicist, Neil deGrasse Tyson of the American Museum of Natural History as a reference to Stonehenge in England.  It only applies to those streets beginning with 14th and going to upper Manhattan that were laid out in 1811.

The edges were allowed to go dark to enhance the effect of New York as a canyon of buildings framing the setting sun. See the photo at the end of this blog for a different interpretation of this same image.
Although the exact date for Manhattanhenge is when the sun is a full ball centered on the street as it sets on the horizon, it is possible to obtain great photos for at least five days before and after the main event.  

Be sure to allow plenty of time in advance of actual sunset.  You will have approximately ten minutes from when the sun peaks around the corner of the southern building until it finally sets.  So get to your shooting site at least a half hour before the time listed for actual sunset.

Photographing the sunset event is not too difficult, if you don't count taking your life in your hands to dodge street traffic.  The three things you will have to deal with are:  finding the right location, selecting the proper lens for what you want to capture, and setting the proper exposure when shooting directly into the sun.

Location:

While any cross street on the grid above 14th Street will provide the proper vista, a good choice is usually one of the wider streets, such as 14th, 23rd, 34th, 42nd, etc.  Two streets that make particularly good vistas are 34th and 42nd Street.  That is because they contain two important New York buildings that look distinctive in silhouette.  The Empire State Building is on 34th Street at Fifth Avenue.  The best place to record its silhouette and the sunset is from the East side of Park Avenue.    

A similarly dramatic view can be had of the Chrysler Building, which is located on 42nd Street at Lexington Avenue.  The best place to include it in your photograph is from an overhang that crosses 42nd Street near First Avenue.  Unfortunately, this is one of the most popular views and is very crowded with people, some of whom show up in the early afternoon to reserve a spot.  Another view of 42nd Street including the Chrysler Building is from street level where 42nd crosses Second Avenue.

The shooting spot happens to be right in the middle of the Street.  People wait for the "walk" signal and then quickly take a few photos before scurrying back to the safety of the sidewalk when the light changes to give the traffic the right of way.  Large groups also gather on the 42nd Street overhand that goes up Park Avenue to Grand Central Terminal.  The problem with this view is that the Chrysler Building is not in the shot so you have to be content with a simpler shot.

Whatever location you choose, it is best to scout it out ahead of time.  The Sunset event happens quickly in less than ten minutes.  When you couple that with all the traffic and crowds, you really do not have much time to prepare on the spot.  

Lens choice:

There are basically two types of shots to this event: One is a wide view that includes some of the story-telling detail of the city.  The other is a tight, telephoto shot of the ball of the sun, perhaps combined with some to the city traffic to add interest.
In this case a moderate wide angle focal length of 35mm includes a full view of the city with the Chrysler Building on the right framing the setting sun.

Here a long telephoto lens of 400mm compress the space.  This enhances the congestion of traffic and provides a solid circular shape to the sun.  The refracted blurs over the traffic were caused by shooting directly into such a powerful light.
 
For a vertical wide angle view you will need the equivalent of a 24-50mm lens.  (All focal lengths here are expressed for full-frame format cameras.  On a camera with an APS format divide the focal length numbers by 1.5.  For instance a 24-50mm in APS size would be approximately 16-33mm).  To obtain a horizontal shot like the first one on this blog entry you will need a lens between 16-28mm.

To capture the ball of the sun takes something between 200-600mm, with 300-400 providing a good combination of full sun and some compressed areas of the city traffic and buildings.

Exposure:

Shooting directly into the sun, especially with a telephoto lens will usually fool the camera light meter into under-exposing the image, resulting in a very dark silhouette with no detail.  It is best to put your camera on manual exposure mode and take a light reading.  Do not read the light with the camera pointed directly into the sun.  This will result in an under-exposed image.  Instead, point your camera to an area of the sky where the sun is just a tiny bit out of the frame, and take a light reading of this area.  Use that as the basis of your starting exposure.  To play it safe, bracket your exposure by shooting one full stop lighter and one darker than the correct exposure.

You probably do not need a tripod because you will be shooting directly into the sun.  This will provide an exposure with plenty of motion-stopping shutter speed.  An ISO setting of 200-400 should work fine for this, and should be sufficient to allow a fast enough shutter speed to hand-hold the camera at a lens opening of f/4-5.6.  

Special effects:
The exact same six-sided star filter was used to create these two photos.  The lens on the left was set to 24mm, while the one on the right was set to 44mmm.  This resulted in a much more exaggerated star effect.
 
A star filter can enhance the effect of the sun with a wide angle lens.  On a lens of normal to telephoto length it can become a bit over-powering.  

Conclusion:

In a situation like Manhattanhenge where you include a very bright light object and dark areas of shadow, it is best to take the photograph in RAW format.  This will give you a wider color and exposure latitude to make corrections and adjustments afterward.  All of the photos used above were done in RAW and enhanced later in Photoshop to bring out the color and details where desired.  

This is the same photo as the one at top that opened this blog entry, but it shows far more detail in the shadow areas and a different tint to the sunset.  Bringing out an image like this was only possible because it was shot in RAW, providing plenty of color and detail with which to work in Photoshop.