Wednesday, July 18, 2012


Understanding Shutter Speed

In an earlier blog post overview on Understanding Exposure, I talked about the relationship of the "Three Speeds", shutter speed, lens aperture, and sensor speed (ISO).  In this post I want to discuss the first, and probably most obvious, of these, shutter speed.  A camera shutter controls the amount of light allowed to hit the sensor by controlling the time interval it is remains open.  For instance, a shutter that remains open for 1/60th of a second, it allows twice as much light to hit the sensor as a shutter set to 1/125th of a second.   Any time this doubling progression occurs, we call it a "full stop" increment.

A list of the full stop shutter increments goes: 1sec, 1/2sec, 1/4sec, 1/8sec, 1/15sec, 1/30sec, 1/60sec, 1/125sec, 1/250sec, 1/500sec, 1/1000sec, and so on.  Some modern cameras have shutter speeds as fast as 1/8000 sec.  And on most modern cameras shutter speeds often progress in longer (i.e. "slower") increments from 1 second down to 30 seconds.  After 30 seconds you can use the "Bulb" feature, which means that the shutter will remain open for a long as you keep the shutter button or cable release pressed.  So in "bulb" mode, you control the actual amount of time the shutter remains open.  This is handy for photographing subjects like fireworks, as we shall see later.  

Stopping action:

The most obvious use of shutter speed is freeze the action in a scene.  A shutter speed that is too slow will allow the subject to appear as a blur in the photograph.  There are two possible causes of blur:  the subject being photographed may be moving too fast for the shutter speed being used, or camera shake caused by unsteadiness in holding the camera by hand.  The photos below illustrate blur caused by camera shake. 

These photos were taken with a 200mm telephoto focal length lens on a hand held camera.  On the left a shutter speed of 1/500th second was sufficiently fast to result in a sharp image, whereas on the right a speed of 1/30th second caused blurring in the leaves. 
 
Generally speaking, a camera should not be hand held with a shutter speed below 1/60th of a second with a normal focal length or less, and even then special care should be taken to steady it.  The actual usable speed is also relative to the focal length being used.  Telephoto lenses magnify movement so that 1/60sec with a 50mm lens is equivalent to using 1/125sec with a 100mm lens, the same as 1/250sec with a 200mm lens.  In addition, most modern DSLR lenses and cameras are equipped with vibration reduction systems that can extend the usable slow shutter speeds.  For instance, hand holding a lens with a vibration reduction rating of 2 means that it can be safely hand held at two shutter speeds less than normal.  

Using blur creatively:

Blur can also be caused by a shutter speed that is too slow to stop the action of a moving subject.  The photo below of the cowboy riding through the falling snow shows the result of a double blur effect from both camera motion and subject motion.  

The camera was intentionally panned to the left at a speed matching the moving cowboy.  A slow shutter speed of 1/25sec  resulted in the falling snow and moving legs of the horse being blurred and streaked.  Because the camera was moving at the same rate at the cowboy he remained relatively sharp.

This photo shows the result of subject blur.  The camera was on a tripod for this nighttime photo of Trafalgar Square, London.  A shutter speed of 1/4sec was not fast enough to freeze the action of the moving traffic resulting in buses blurring as they went by.  The rest of the scene is sharp because the camera was on a tripod.
Here is another example of the blurred subject technique done for effect.  The exposure was a full 3 seconds.  Such a long exposure allowed the lights from the passing traffic to create bright blurring streaks as it passed by.  The stationary scene of the London Parliament buildings remain sharp because the camera was on a tripod.
 
Another use of slow shutter speed is to create motion in flowing water.

The waterfall photo on the left was taken with a shutter speed of 1/100sec.  At such a high speed the falling motion of the water is stopped.  For the photo on the right a shutter speed of 1/2sec was used to allow the flowing water to blur in the frame and give more of a feeling of the actual waterfall.  The slower speed required the camera to be on a tripod during the exposure.
 
Freezing action:

The shutter speed needed to freeze the action of a moving subject depends upon three things: the speed of the subject, the focal length of the lens, and the direction of the motion relative to the camera.

While a shutter speed of 1/250sec may be sufficient to stop the action of a person walking, it might take upwards of 1/2000sec to stop the action of a fast moving race car.  The actual speed needed to stop the action also depends on the focal length.  Telephoto lenses require higher shutter speed to stop action than do wide angle lenses.  Finally, a subject moving across the picture frame also requires a higher speed to stop its action than a subject moving towards the frame.  Let's look at some examples.

This photo shows a ball player sliding into a plate.  His direction is directly into the camera and the shutter speed of 1/1250sec was sufficient to freeze his action.  The baseball, however, is moving across the picture frame so that even at such a high shutter speed it still shows some motion blur.
 
Here the action of the jumping athlete was frozen in mid-air with a shutter speed of 1/1000sec .  The photo was taken with a 400mm telephoto lens with the subject moving towards the camera.
In this example the subject is moving across the picture frame.  The picture was taken with a 35mm wide angle lens and shutter speed of 1/640sec.   The wider angle lens helped to freeze the action, but even at a relatively high speed of 1/640sec there is still some traces of blur in the hands and feet.  This is caused mostly to by the direction of motion across the picture frame.
Conclusion:

Choosing a shutter speed is not always arbitrary.  Often the correct choice can enhance a subject by either freezing the action or by allowing its motion to blur.  It is best to experiment a bit with various speeds to gain some experience of what speed works best each situation and with the various focal lengths.  

A shutter speed of 1.3sec blurred the falling in much the same way as it did in the waterfall samples earlier.
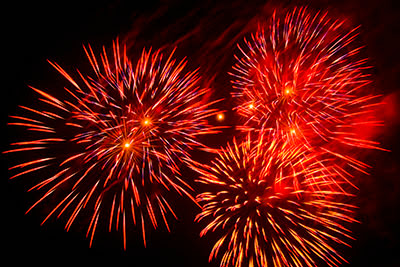
For these bursts of fireworks the shutter was left open for a full 4seconds.  This allowed the bursting fireworks to "paint" themselves against the black sky.


Thursday, May 31, 2012

Achieving a sunset look when photographing at mid-day

This is a lighting technique I came up with years ago to obtain the look of a sunset or late afternoon light when I had to shoot at in mid-day.  It was easier when I originally did it because I was shooting on film, and in addition the lenses were not as coated and resistant to flare as they are today.  At the time I used large 4'x8' foam panels that were used as insulation in building construction.   They were covered with a shiny silver mylar and had a a large red design printed all over.  This gave a very warm color when it reflected the sun.

I positioned the panels behind the model and angled them to reflect the sun so the light hit the model out-lining her in a glow, and then the light entered the camera lens to cause a severe flare.  This technique works best when the lens aperture is very open.

For the examples below, instead of the construction panels, I used two large Wescott 72" Gold reflectors.  You can see them directly behind the model.  There is no fill at all from the front so the model is completely back lit. This is a difficult situation for a lens to auto-focus.  A lens with a wide open aperture helps.  In the samples below I used a zoom lens with an aperture of f/2.8 and a focal length of 125mm for the top image and 200mm for the bottom one. 

I placed two large and very shiny reflectors behind the model to serve as a partial background and positioned them to pick up the hot mid-day sun, and reflect it past the model's face and directly into the camera lens
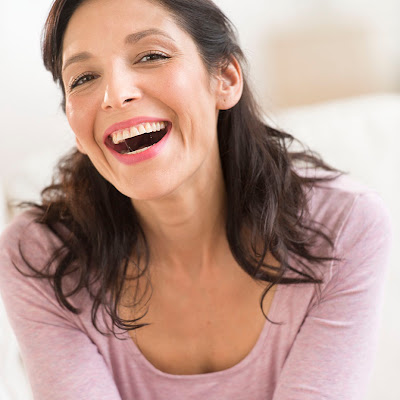
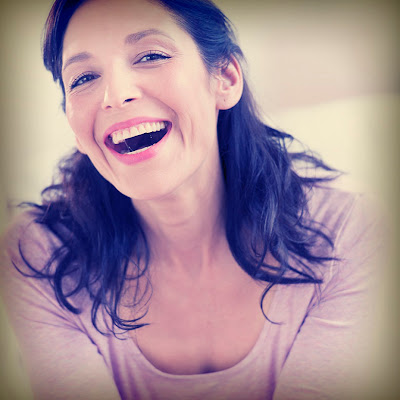
For the top photo I wanted the warm-colored, playful light of a summer sunset, whereas for the bottom image I wanted more of a desaturated tone to emphasize the serious, no-nonsense intensity of the athlete's stare.  A warm Photoshop filter gave the upper image its color, while the Vibrance control dialed down the color in the bottom photo.

Friday, May 25, 2012

Give your photos an Instagram effect in Photoshop

This is a very simple Photoshop technique for transforming your images into an old-fashioned, faded print look similar to what is done in the Instagram app.

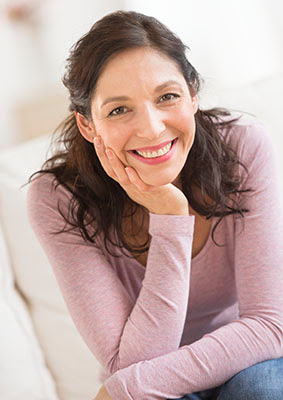
This is the original photo cropped into a square.  The square format looks best with this technique.

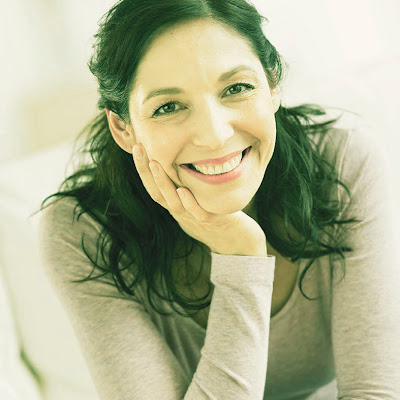
Add a layer above the image and fill this layer with a light color.  Pastel shades work best. You can use one od the colors from the chart below. Change the mode of this color layer to Multiply.  This gives the image a color cast and reduces its contrast.  Next add a levels layer to the original image layer and change the color.  Change the RGB layer to the right to brighten the photo.  Then select the red, green, and blue layers in succession and alter each of them by moving their sliders left or right to suit the look you want.  A soft vignette was added using the Gradient tool to make two separate layers, one vertical and the other horizontal.  Both layers were changed to Multiply mode and merged together.  Finally, the opacity was reduced to around 60%.


Here is a selection of some colors you can use to create the top color layer.  Once this layer is in place, change its mode to "Multiply".


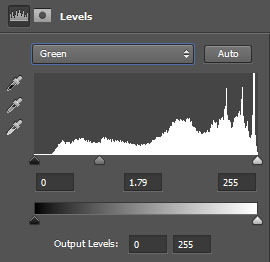
This shows the levels set to modify the green channel by sliding the central slider to the left.  You simply play with this slider until you achieve an effect you like.


This is what the combined vertical and horizontal Gradient layers look like when they are both in multiply mode and merged together.  The next step is to change the merged layer to a luminosity mode and  reduce its opacity to suit your taste.

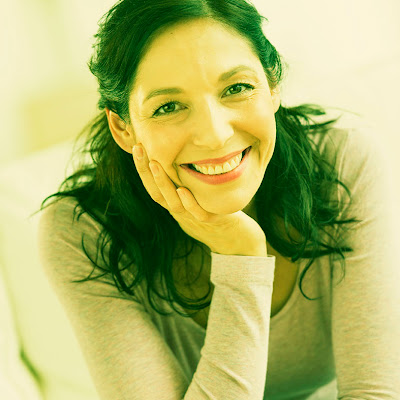
One more example to show a different effect using the same technique.  This time no vignette was created.

Here I changed the color a bit more dramatically in a different direction than in the first sample to show a bit more of the range of this technique.  As a final adjustment, I added a curves layer to each of the photos and adjusted the contrast with an "S" curve.
You can further reduce the faded look of the image by muting the colors using the Vibrance tool in Photoshop.
The variations of this simple technique are endless, making it very easy to customize it to suit your personal taste.

Friday, May 4, 2012


Adding interest with a point of view

Point of view can have both a literal and conceptual  meaning.  Literally speaking,  where the camera is when it takes a picture establishes its " point of view".  From a conceptual standpoint, "point of view" indicates the photographers interpretation of a scene.  In fact, the two should go hand-in-hand.  

Typically, we all see life from a standing up or sitting perspective, our eyes always at a fixed height above the ground.  When we take up photography it is only natural to continue to record life from this eye position.  We are so accustomed to it that we rarely think to move ourselves to a completely different position in order to gain a different perspective on a scene -- a different point of view. 

Where the camera is placed when taking a photograph can enhance the meaning of a scene by providing an angle of view that has a specific meaning.  Most professional film makers and photographers are aware of this and use it for dramatic effect.  For instance, we mostly engage other people at eye level.  Looking down  or up at someone shifts the perspective and provides a different relationship to the person or thing being viewed. 

Two different camera positions were used in the photos of the boy below.  On the left, a high camera angle directly above the boy has him looking up as if he was looking into his parent's face.  On the right, where the boy is playing on the floor with his truck the camera was moved to his level and provides a more unobtrusive look at the boy at play.


These two shots of an iguana illustrate the importance of camera angle.  On the left the camera was a eye-level while standing.  On the right the camera angle is just above the sand at the level of the iguana's eye and lets us see him and his environment from the perspective of his own living space.
 
Fly on the wall

When I taught photography, I asked my students to think of themselves as having the agility of a fly, and imagine themselves flying about a scene looking for a spot to land that would give them a unique point of view, one that provided a more meaningful interpretation of the scene. What would the scene look like if shot from the ceiling, or from the floor?  How would it look if they landed on a table and took the photo from there?  If someone were opening a present, what would the scene look like if the camera were inside the box?  These exercises were meant to stretch the creative imagination.  In addition, thinking this way forces photographers to really understand what the scene means to them, and carefully selecting a meaningful point of view  enhances this understanding. 

This is a "fly's eye" view of the Brooklyn Bridge taken at dusk with 21mm lens on a full-frame camera.  The camera position is low, just above girder height, and suspended out over the roadway.  This adds substantially more drama than if the photo had been taken from eye level on the walkway on the right.
Here our imaginary fly landed on the chessboard.  This angle adds a greater sense of power to the scene and makes  the story more immediate by showing it from the position of the chess pieces.

 
Angles add relationships

Employing a dramatic angle can add substantial drama to a scene, but it can also be used to relate foreground and background elements to tell a story. 

Getting in very close to the bottom of these tall redwoods and looking directly up with a very wide angle lens emphasizes their immense size from a personal perspective, while at the same time providing a story-telling detail with the closeup of bark on the bottom of the trees.
By placing the camera at a very low ground level and using a wide angle lens the detail in the foreground pediments is juxtaposed with the entire building of the Library of Ephesus in the background.  Camera angle relates the subjects to tell a fuller story and provide more information about the scene.
Positioning the camera directly above the scene, we see the sleeping baby cupped in its mother's hands from the perspective of the mother herself.  Here camera angle serves to put us directly in the scene.
  
 
Practical reasons for angle selection

The position of the camera can also be useful  in clarifying a subject by making it stand out more in the scene.  The examples below illustrate this point.

A very low camera angle allowed the canon to be clearly outlined against the sky.  An eye level  view from a standing position would have placed most of the shape of the canon against the ground where its detail would have blended into the dark foreground and been lost.
For this view of the Coliseum in Rome the camera was placed on the sidewalk.   This raised the position of blurred lights from passing cars.  This higher placement of the blurs in the image frame places them directly over the building in the background and gives them far more compositional impact.
 
Angles for design and impact

Severe viewing angles can not only add dramatic impact to a scene, they can also add provide an interesting compositional design.

The camera was situated on the ground directly below the jump.  This angle placed the athlete against the sky where his form created a strong visual graphic that illustrates the grace of his form.
A camera angle from above shows the complete symmetry of the rower and his wake.  Keeping the subject perfectly aligned in the center of the frame further emphasizes this symmetry.
Placing the camera on the ground and having  the children lean over it creates a strong graphic that adds interest to a simple portrait.

 Conclusion
 
A photograph is a visual way of telling a story.  Understanding and controlling the point of view is a means of making that story clearer and more interesting.

Saturday, March 24, 2012

Photograph Cherry Blossoms in Washington D.C.

One of the most popular tourist destinations in spring is a visit to Washington DC to experience and photograph the cherry blossoms in bloom.  This post presents some tips for achieving better photographs of this beautiful event.

Juxtaposition of the blossoms against a backdrop of the surrounding monuments is one way to relate the blossoms to their setting.  Where you place the main focus and the aperture you choose are important.  Here the focus is on the foreground blossoms.  A lens aperture of f/8 with a 60mm focal length kept sufficient focus on the Jefferson Memorial to see its identifying details.
Equipment: What you need

It is best to have a full complement of focal lengths, from very wide angle to telephoto, and macro.   In addition, a polarizing filter is a must.  Not only will it saturate the blues in the sky, it will also bring out the color in the blossoms by eliminating specular reflections.  You should also pack along a flash to fill  in the darker flowers that are in shadow.  A tripod is probably  not necessary, since you will be photographing primarily in bright weather conditions.

Where to go:

The cherry blossoms are concentrated around the Tidal Basin that sits in front of the Jefferson Memorial.  The best way to experience the view is to walk around the basin.  Begin your visit at the Jefferson Memorial and head south along the path that surrounds the basin.  Look for signs to the Roosevelt and Martin Luther King memorials and follow them. 

You will want to hit the flowering blossoms as close to their peek of this two week event as possible. You can easily find a calendar updating the progress of the bloom by searching the internet.  Expect it to happen sometime from mid-March to the beginning of April.

Early afternoon is a good time to begin, as it will put the sun behind you as you photograph and you will be primarily facing into the bluest part of the sky.  Continue around the Tidal Basin until you come to the main road.  Here you will find some of the fullest examples of blossoming trees.

This public map of the area shows the Tidal Basin with the Jefferson Memorial above it.  Begin there and take the path to the right around the water towards the other memorials.
Keep an eye out for trees and branches that can be used to frame the background scene.  This integrates the blossoms into their environment and tells the travel story of where you were.  Here the Washington Monument is frame by the dramatic shape of the tree.  An extreme wide angle lens allowed the inclusion of the top of the tree which contained the greatest concentration of blossoms.  The wide angle also kept the background monument small and subdued in the frame, giving greater importance to the blossoming tree.
 
Using a wide open aperture resulted in throwing the background more out of focus and kept the concentration on the delicate foreground flowers.

Using a flash for filling in the shadows:

Often you will be working with blossoms that are in the shadow of the tree.  Exposing for the blossoms will result in over-exposing the background, while exposing for the background will darken the blossoms.  A solution to this is to use an on-camera flash to add some fill light to the shadow areas.  For the most part a built-in camera flash will do the job, although you can use an auxiliary flash instead.  The main thing to keep in mind is not to add so much light to the shadows that it over powers their exposure and looks "false" relative to the integrated background.

The two photos below show the effect of using a flash.   In the top image the blossoms are in shadow and much of their bright color is lost.  Since the blossoms are the main subject here, we want to bring out the color as best we can.  In the bottom photo and on-camera fill flash in TTL mode was used to brighten the shadowed flower sufficiently to integrate their exposure with the background and enhance the colors in the flowers.


Vary the focal length to add interest:

This is a location where you can use every lens in your camera bag.  The extreme wide angle lenses are useful for integrating large areas of the foreground scene with the background.  Using a wide angle lens in close on the flowers will make them loom large in the frame, and keep the background scene subservient. 

These two images illustrate the difference between using a wide angle lens (on left) and telephoto (on right) to photograph the same subject.

A macro lens will allow you to come in close for detailed views of the flowers.

Instead of a macro, a wide angle lens used very close to the flowers resulted in a dramatic interpretation of the scene by contrasting the delicate blossoms with the craggy tree.
And of course don't forget to take photos of the blossoms by themselves.  In this image the sun is peeking out from behind a branch.  In a situation like this the camera exposure meter will tend to over compensate and darken the scene.  It is usually best to switch to manual model and over-expose by as much as a full f/stop.


Look for other opportunities to combine with the blossoms.  Here the statue of Martin Luther King, Jr. is framed by the soft pastels of blue and pink of the sky and flowers.

Sunday, February 26, 2012


Buying a DSLR camera system
 
Many people have asked for my recommendation on buying a camera so I thought I would do a blog post on the topic.  I assume that if you are reading this blog you are doing so because you want to move into serious photography.  The recommendations of this post are being written with that thought in mind and concentrate more on cameras that are suitable as introductory models for beginning a camera system.  Build the right system early on and you can add to and improve it as you go.

Let me say from the outset, choosing the right camera system at this stage is more important that simply choosing the right camera.  The current leaders in professional DSLR camera equipment are Nikon and Canon, and for good reason.  Both companies in addition to making excellent cameras also support those cameras with extensive lens systems and accessories.  Before you can make a decision on what camera you want, you need to fully understand how you plan to use it, and then analyze the lenses you will need to tackle your subject.

Choosing the right lenses may be more important in the beginning than choosing the right camera.  So give it careful thought.  Buying a really good camera and then fitting it with sub-standard optics is a waste of money because the camera will never be able to realize its full potential.  
A camera such as the Nikon D7000 is a perfect choice for someone beginning a system.  While not as tough as the pro model D4, D800, D700,  or D300, it does have a stronger partially metal body that is resistant to abuse.  It also incorporates many of the pro features found on the full professional Nikon cameras.  It has an APS-C sized sensor (called DX by Nikon) so it can use less expensive DX lenses.  Its low light ability is excellent with low noise.  At 6fps its motor is fast enough to catch active subjects.  The body is smaller and lighter than other pro cameras making it convenient to carry.  For people who would want to begin with something costing less, the Nikon D5100 has the same sensor, a lighter (but not as durable) body, and produces equal resolution at a much lower price.


Sensor size:

For serious shooters there are really only two choices here:   a full-frame sensor or an APS-C sized sensor.  "Full-frame" refers to a sensor that is approximately the same size as 35mm film.  Until recently, full-frame was the only way for a pro photographer to go.  Today, however, ever-improving sensor technology has resulted in smaller APS-C sized sensors of extremely high professional quality.

Full-frame sensor cameras are at the top end in terms of cost.  And you will only add to that expense because it is necessary to use only the highest quality lenses (i.e. "expensive") on a full-frame camera.  To do otherwise is a waste of the resolution advantage of the camera.  An APS-C sensor, being smaller, does not need to have a lens with as much coverage area.  This makes a big difference in terms of cost and size for the same relative quality.   As a result, when you compare the over-all cost of a full-frame camera system to an APS-C system the difference can be enormous. 

A lens meant for a full-frame camera can definitely be used on an APS-C camera because the  image it throws more than covers the smaller sensor.  The reverse is not true however.  You cannot use a lens intended for APS-C size on a full-frame size sensor.  The image from the lens will simply not cover the picture area. (See the chart below.)  Knowing this, you might want to think about whether you want to start out small now with an APS-C sensor camera, and later move up to a larger, professional full-frame camera.  If that is the case, you should probably consider purchasing full-frame lenses from the beginning.
This chart shows the relationship of camera sensor sizes. Notice how the coverage area of a full-frame lens covers all sensor sizes, while a lens made specifically for APS-C does not cover full-frame.  Also note how there is some vignetting on the full-frame sensor but not on the small APC-C sensor.  Using a full-frame lens on and APS-C sensor camera has the advantage of working with what it termed the "sweet spot" of the lens, namely that area producing the best image quality. 
 
Camera models change approximately every two years, while lenses do not change nearly as often.  It is more important to give serious thought to your lens system in the beginning and perhaps save some by putting most of your money into quality optics and purchasing a less expensive camera model that will be out of date within two years anyway. 

Features:

Resolution:

For serious photography you will need a camera with a resolution of at least 12-18 megapixels.  Nikon now has a full-frame sensor (which Nikon refers to as FX) camera, the D800 with a 36MP resolution.  This may be over-kill for many users, unless you plan on making very large prints.  Nonetheless, the camera does have the advantage of also being able to operate in APC (Nikon calls this DX) mode as well at 15mp (megapixels).  This means the camera can use both full-frame and APS-C lenses.  It simply down-grades itself to a smaller sized sensor when the smaller lens is used.

In the introductory full-frame category Canon makes the very popular 5D MkII, a 21.1mp full-frame camera with excellent video capabilities. This camera has been around for awhile and is probably scheduled for a replacement by soon.  Nikon has the D700, a full-frame (FX) camera with the same sensor at its flagship D3 model.

Do not be fooled into thinking that high megapixel sensors are necessarily better than sensors with fewer megapixels.  When Nikon introduced its D3 and D700 professional cameras with only 12.1mp, at first it shocked the photo community.  But Nikon had discovered that by not crowding too many megapixels onto the sensor, it improved low light photography by reducing noise levels.  In addition, it allowed the camera to operate at extremely high speed (in the case of the D3s, 9 frames per second with a burst rate of almost 50 RAW images and literally non-stop with jpg) because it was not bogged down having to process a lot of high resolution images and transfer them to a CF card.  The new Nikon D4 has even better noise control and speed with a resolution of 16.2mp.

DxO Mark is a web site that rates camera sensor quality.  You might want to check it out to see how the camera  models compare in the various categories of color, noise, and dynamic range.

Both Canon and Nikon make pro-quality APS-C sized cameras.  Nikon's D7000 is a hybrid model that has many of the durability features of its pro cousins but is much smaller in size and less expensive.  Nikon's D5100 is an consumer based camera with exactly the same sensor and resolution at the D7000.  If you do not need the durable features of the D7000, this could be a good alternative.

The Canon 7D is an 18mp pro version of an APS-C sized camera.  Here, too, if you do not need the durable pro body, you could opt for the Canon 60D or Rebel T2i similar 18mp resolution sensors.

Focus:

Pay close attention to how a camera focuses.  Look through the viewfinder.  Are the focus points evenly spread out over the sensor area?  Are the focus points in places where you would normally place an important subject?  Can you change focus points quickly and conveniently?  These are important considerations as you gain speed with using you camera and want to capture spontaneous action.

In addition, lenses have their own speed of focus and ability. You want a camera system than can focus quickly, accurately, and conveniently.  From tests I have performed, the clear winner in this category is Nikon.  Canon is very good, but I find its focus points inadequate and more cumbersome to change.

Burst rate:

Burst rate is the number of images a camera can take before is slows to a crawl while it writes them to disc.  If you photograph sports, birds, or any other fast-moving subject,  you will want a camera with a high burst rate.  Shooting in jpg format allows for much longer burst rates because there is not as much picture data to transmit due to jpg's 8-bit size.  However, anyone serious about photography will want to shoot in camera RAW mode.  This is a 16-bit format and carries much more informational data for each picture.  Shooting RAW will be much slower to process, but provide post-processing benefits that make it a necessary consideration. 

Video:

Most new camera models are capable of capturing HD 1080 video.  This feature may or may not be important to you.  This blog is chiefly concerned with shooting still photographs so I will not go into depth on this feature.

ISO range:

ISO is a rating of a sensor's speed in reacting to light.  Every time you double the ISO rating you double the sensitivity.  Cameras work best at their native ISO levels, which is usually in the 100-200 range.  Increasing ISO increases sensor sensitivity to lower light levels but also introduces degradation of the image in terms of noise (think of this as film grain).   You can check out a camera's  ISO abilities on the DxO site mentioned earlier.  A camera manufacturer may list a camera ISO range at 6400 or even above, but that does not mean the image will be up to your quality standards if pushed that high.

Menus and ease of use:

Modern technology has introduced so many changeable features into current product lines that it is sometimes impossible to understand all of them without carrying around a manual.  See how comfortable and intuitive your camera choice is.  I find Nikon to be the most convenient pro and amateur camera to use.  For one thing, it makes all of its models -- both pro and amateur -- conform to almost the same menu system and manual controls.  This makes it easier to move from one model to another as you upgrade your camera to a newer model or change to a higher grade later.

Conclusion:

I realize that I have only mentioned the Canon and Nikon DSLR brands.  This is not because there are no other good options out there.  Sony, for one, has been introducing some very high end cameras with Zeiss optics.  The thing is that both Nikon and Canon have been producing pro camera systems for decades.  They have a clear understanding of what photographers need in terms of reliability, convenience, support, and accessories -- plus they manufacture excellent options for every budget and level of expertise. 

Once you commit to a particular camera, you will build up a considerable array of lenses, flashes, and other accessories making it difficult to switch to another brand later.  So give serious thought to your choice of brand, and look at more than just the camera body.  In the end you will spend more on lenses and accessories than you will on the camera itself.

Sunday, August 28, 2011

Understanding Exposure Part 1: Moving your camera into Manual mode


 Modern cameras with their built-in modes for every anticipated photo situation from macro to landscapes have actually made it more difficult to learn camera basics by separating the photographer from the essential elements that make up a correct exposure.  The purpose of this lesson is to break down camera exposure into three basic elements -- what I will be calling "speeds" -- and show how each of these elements relates to the others.  From there you will find that it is easy to determine the correct exposure in any situation and that mastering control over exposure is what will provide you with creative control over your photograph.
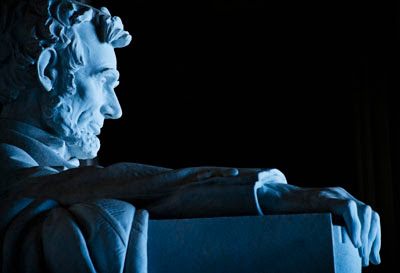
Most cameras meters will read a scene and try to average it out to a neutral exposure.  In situations like this the photographer must determine in advance what is important and adjust the exposure to obtain the proper results.  Here, setting the exposure for the face of the statue rendered the deep background shadows a dramatic black in contrast.

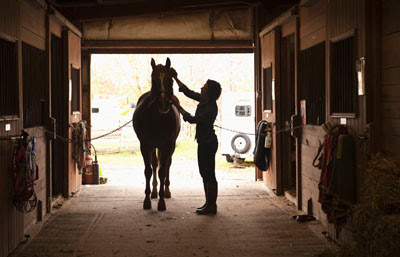
Only a knowledge of camera exposure will allow a photographer to capture a scene such as this.  The interior of the barn shows detail while the exterior if over-exposed.  Knowing where to place the exposure made all the difference in this image.
 
The Three Speeds:

There are three elements that affect the amount of light hitting the camera sensor.  We will refer to each of these elements as a "speed" in the sense that each controls in its own way how fast light is deposited on the sensor.  The three speeds are:  shutter speed, lens speed, and sensor sensitivity speed.  the three need to be in harmony to produce a correct exposure.  Sounds simple so far but gains in complexity as you realize that you can in fact make changes to any of these speeds (usually for aesthetic reasons) so long as you make an equal and opposite change in any of the other two speeds.  Let's look at each speed separately and then see how they are related.

Shutter Speed:

Shutter speed is usually the easiest to understand.  It simply refers to how long the camera shutter is open to allow light to pass on to the sensor.  This is measured in seconds and fractions of seconds.  The typical increments of shutter speeds starting from one second are:

1 second, 1/2 second, 1/4 second, 1/8 second, 1/15 second, 1/30 second, 1/60 second, 1/125 second, 1/250 second, 1/500 second, 1/1000 second, 1/2000 second.  

Shutter speeds exist above and below these increments, but you will notice a trend in this list.  Each shutter speed halves or doubles the speed of the shutter speed immediately before or after it.  For instance, 1/125 second is twice as fast as 1/60 second and twice as slow as 1/250 second.  Looked at another way, 1/125 second allows half the amount of light to pass as 1/60 second and twice the light as 1/250 second.
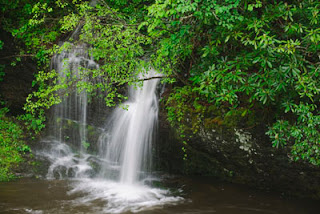
A very slow shutter speed of 1/4 second was necessary to allow the running water to blur.  To keep the rest of the scene in sharp focus it was necessary to have the camera on a tripod.
 
In the past, full increments were the only shutter speeds cameras had.  The advent of electronic shutters  has allowed manufactures to create fractional shutter speeds.   Adding to the confusing, the user can actually set the fractional increment in a menu option on most DSLR cameras.  For now, it is important to grasp the basic shutter speed units listed above.  The fact that they can be further divided into 1/3rd or 1/2 units won't  alter the principle of inter-related speeds.
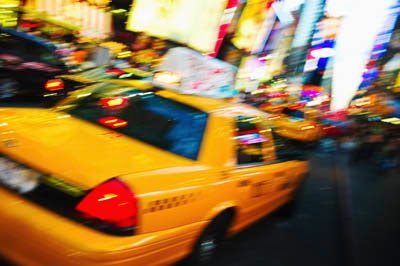
With a hand-held camera the photograph panned the camera from left to right as the taxi went by.  This created some blur in the scene of New York's Times Square that accentuates the excitement of night time in the city.
 
There are, of course, reasons why you would want to select one shutter speed over another.  Typically these reasons have to do with selecting a fast shutter speed that will freeze a particular action, or selecting a slow shutter speed because it will allow you to close the lens aperture further to increase the area of focus, called "depth of field".  We will cover these creative reasons in more detail individually in a future lesson.  For now, let us stick to how the three speeds are related on one another.

Lens Speed:

The speed of a lens is controlled by its aperture, and reflected in a number called the "f/stop".  The aperture is a moving diaphragm inside the lens that changes in size.  As it opens, it allows more light to pass through the lens to the sensor.  As it closes, it cuts the amount of light passing on to the sensor.   Here is a list of the common f/stop apertures found on camera lenses:

f/1.4, f/2, f/2.8, f/4, f/5.6, f/8, f/11, f/16, f/22, f/32
In situations where you want a very shallow depth of focus, the lens aperture needs to be very fast (i.e. open). For this photo an aperture of f/2 was used on a 135mm telephoto lens to pinpoint the focus on the shell while the little girl's face was completely out of focus.
 
As with shutter speeds, there are further aperture openings beyond this list, but this is the practical limit.   Like shutter speeds, these apertures also half and double each other so that an aperture of f/4 allows half as much light to pass as f/2.8, and twice as much light at f/5.6.  Also like shutter speeds, apertures can be further broken down into thirds or half units by setting the camera menu.  For now we will stick to the full one-stop increments as an easier way of understanding exposure relationships.
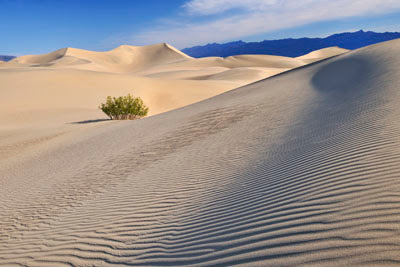
Selecting a very slow lens aperture of f/16 and maintaining the native 100 ISO of the camera contributed to the overall sharpness and depth of focus in this image of dunes at Death Valley.  Knowing this going in the photographer realized that  the camera needed to be on a tripod to compensate for the very slow shutter speed of 1/15 second.
 
Sensor Speed:

Sensor speed is the speed at which the sensor captures light.  It is measured in ISO.  Most modern sensors have a base ISO of 100 or 200.  From there sensors increase in speed in increments similar to the other two speeds, namely by doubling the light sensitivity of the prior speed as follows:

ISO 100, 200, 400, 800, 1600, 3200, 6400, 12800.

Each unit doubles or halves the nearest unit.  For instance, ISO 400 has the sensor capturing light twice as fast as ISO 200 and half as fast as ISO 800.  You might ask why not go for the highest available ISO?  The answer is that any increase or decrease in ISO speed from the camera base unit (referred to as the "native ISO") degrades image quality by introducing noise (similar to "grain" in film) , and loses detail.  So increasing (or decreasing) ISO speed from the norm is a trade off.
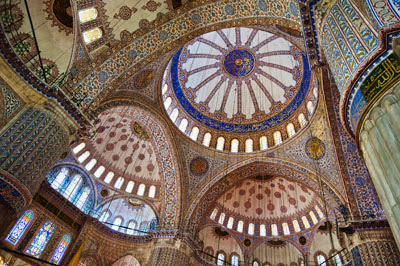
Many locations to not allow a tripod.  This photograph of the interior of a mosque in Istanbul was achieved by increasing the ISO of the camera sensor to 1600 and selecting a fast, open aperture on the lens that allowed the camera shutter speed to be set high enough for it to be hand held.
 
As with the other speeds, ISO can be further broken down in 1/3rd increments.  (e.g. 200, 250, 320, 400, etc.)  For the purposes of our discussion, let's not confuse the issue and stick to the full units in all speeds.

Putting it all together:

A light meter is used to measure the amount of light falling on a scene.  Modern DSLR cameras have a light meter built into them.   Professional photographers will usually also have a hand held separate light meter to determine accurate readings of a scene and to record the differences between the shadows and highlights.  For now, let's just work with the built-in camera meter.

When you look through the viewfinder of your DSLR you should be able to see the light meter scale.  If you don't know where it is, consult your camera manual.  Most scales have a center mark, usually a line, that marks when the exposure is correct.  There should also be a plus (+) and minus (-) indicator on either side of  the center line.  In between there are usually marked scale increments.  These may be given in thirds, halves, of full speed increments.  

The correct exposure for any scene is measured by the central indicator of the exposure scale.  There should also be a second moving element -- a line, dot,  or light -- that indicates the manual setting of the camera as it relates to the correct exposure.  Simply put, when your camera is in manual (M) mode and the center of the exposure scale is lined up with the moving element of the scale the camera is set for a correct exposure.  If the moving part of the scale is on the minus (-) side of the scale, your camera setting is under-exposed and the picture will be too dark.  If the moving part of the scale is on the plus (+) side of the scale, your picture is over-exposed and will come out too bright.
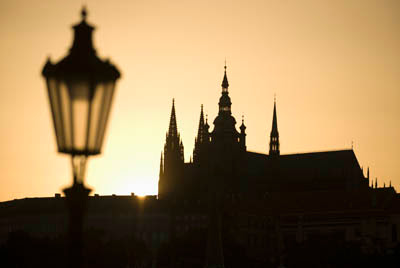
Deciding to have the cathedral in silhouette and the foreground lamp out of focus were creative decisions the photographer used in determining the exposure for this scene.
 
How to achieve a correct exposure in manual mode:

With your camera in manual (M) mode, you first need to select an ISO setting.  This is usually done from either a menu option of a button or dial marked "ISO" on the camera body.   Sensor speed (ISO) degrades image quality as it increases so you want to keep it set as close to the native ISO of the camera as you can.  Circumstances will dictate what you can do.  On a normal, sunny, or lightly overcast day, it is usually best to leave it at the native ISO setting of 100 or 200.  Indoors or on an overcast day or deep shadow area, you will want to increase ISO.  For this a range of ISO 400-800 will do the trick -- keeping in mind that lower is better.  In very dimly lit situations, such as at night, in a darkened room or club, you will need to boost the ISO towards its maximum level - a range between 800-6400.  As a rule of thumb, try not to boost the ISO beyond 1600.  On most cameras image quality deteriorates dramatically above that.

Once you have set your ISO, open your lens aperture (f/stop speed) to its maximum opening.  Next change the shutter speed until you zero out the exposure scale that is in your camera on the camera display.  By "zero out", I mean move the needle, or whatever mark your camera has, until it coincides with the middle setting of the exposure scale.  At this point, you have achieved a correct exposure setting .  The next thing to understand is that there can be more than one correct exposure.  Understanding this and how to make exposure changes is at the heart of why you would want to use the manual setting  at all.

Relationship of the three speeds:

We have already seen that each of the three speeds -- shutter speed, lens speed (f/stop), and sensor speed (ISO) -- half and double the increment above and below it.  That means that all three speeds are related in the same way.  If you make a change in any one of them, you can equalize that change with a move in the opposite direction of one of the other speeds.  Let's look at an example.  

Suppose you have a correct exposure of ISO 200, f/2.8, and 1/500 second, but instead of f/2.8, you want to have an aperture of f/5.6.  f/5.6 is two steps away from f/2.8 (f/2.8 to f/4 to f/5.6).  To compensate for that move you have to make an opposite move with one of the other speeds.  For instance, you could decrease the shutter speed to 1/125 second (1/500 to 1/250 to 1/125 equals a move of two increments). Alternatively,  you could increase the sensor speed from ISO 200 to ISO 800 (ISO 200 to ISO 400 to ISO 800 is two speed increments).  Instead of either of these moves you could have decided to make one incremental change in the ISO from ISO 200 to  ISO 400, and one shutter speed change from 1/500 second to 1/250 second.  That also would have equaled a two stop speed change to equalize the 2-stop change you made to the aperture.
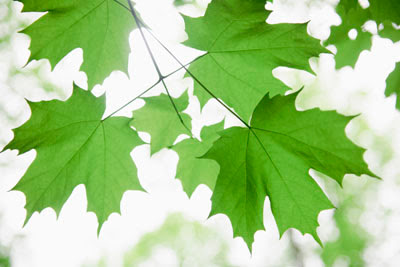
Most cameras set to automatic would darken this image and yield the background more in focus.  Creative control over the aperture and knowledge of exposure was necessary to arrive at a light and airy image with a soft, out-of-focus background.
 
Conclusion:

The question all this raises is "why" you would want to have control over your exposure speed settings.  The answer to this is that selection of aperture, shutter speed, and to some extent ISO is a creative decision.  There are specific reasons why you would want a slow or fast shutter speed or why you would want to select an open or closed aperture. There are practical reasons also.
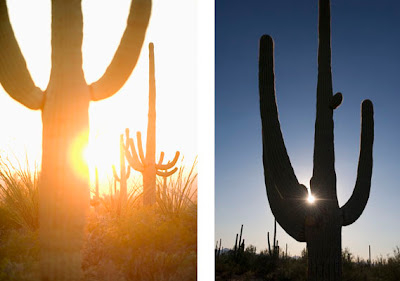
Sometimes exposure alone can completely alter the outcome and interpretation of the image.  These two photos were taken within minutes of each other.  Creative choices of exposure and lens choice made the difference.  Each is a different way of seeing the same scene.  Knowledge of exposure and the ability to change it resulted in varying interpretations.
 
Knowing when and why to veer off of the "correct" exposure is what creative photography is all about.  The next three lessons will cover each of the three speeds in depth and explain the practical and creative potential of each.