Give your photos an Instagram effect in Photoshop
This is a very simple Photoshop technique for transforming your images into an old-fashioned, faded print look similar to what is done in the Instagram app.
 |
| This is the original photo cropped into a square. The square format looks best with this technique. |
 |
| Add
a layer above the image and fill this layer with a light color. Pastel shades work best. You can use one od the colors from the chart below. Change the mode of this color layer to Multiply. This gives the image a color
cast and reduces its contrast. Next add a levels layer to the original
image layer and change the color. Change the RGB layer to the right to
brighten the photo. Then select the red, green, and blue layers in
succession and alter each of them by moving their sliders left or right
to suit the look you want. A soft vignette was added using the Gradient
tool to make two separate layers, one vertical and the other
horizontal. Both layers were changed to Multiply mode and merged
together. Finally, the opacity was reduced to around 60%. | |
|
|
 |
| Here is a selection of some colors you can use to create the top color layer. Once this layer is in place, change its mode to "Multiply". |
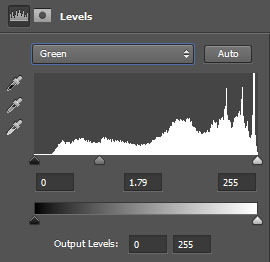 |
| This shows the levels set to modify the green channel by sliding the
central slider to the left. You simply play with this slider until you
achieve an effect you like. |
 |
| This is what the combined vertical and horizontal Gradient layers look like when they are both in multiply mode and merged together. The next step is to change the merged layer to a luminosity mode and reduce its opacity to suit your taste. |
 |
| One more example to show a different effect using the same technique. This time no vignette was created. |
 |
| Here
I changed the color a bit more dramatically in a different direction
than in the first sample to show a bit more of the range of this
technique. As a final adjustment, I added a curves layer to each of the
photos and adjusted the contrast with an "S" curve. |
 |
| You can further reduce the faded look of the image by muting the colors using the Vibrance tool in Photoshop. |
The variations of this simple technique are endless, making it very easy to customize it to suit your personal taste.


No comments:
Post a Comment